WebPT EMR | Patient Payments
- 07 May 2024
- 4 Minutes to read
- Print
- DarkLight
- PDF
WebPT EMR | Patient Payments
- Updated on 07 May 2024
- 4 Minutes to read
- Print
- DarkLight
- PDF
Article Summary
Share feedback
Thanks for sharing your feedback!
Overview
WebPT's Patient Payment system streamlines the entire payment collection process allowing you to track dollar amounts for copayments, coinsurances, deductibles, and other sales transactions including wellness products and therapy supply sales. You can review detailed summaries of balances and collected payments, as well as record payments in an appointment or in a case and print payment receipts and histories.
Click the arrow or colorblock below to discover more.
Benefits
WebPT EMR + Payments | Benefits
- Copay, Coinsurance, and Deductible information entered in the patient chart carries over to the Scheduler, where you can record collected payments when the patient checks in.
- Payment history is available for each patient case in the patient chart. Track current balances and print a full history.
- The Payment Log provides valuable business insights by tracking money collected and outstanding balances for the entire clinic.
- You can enter payment information directly from the appointment on the Scheduler, or in the patient chart.
Discover even more with our Integrated Credit Card Processing feature.
Add Copay, Coinsurance, and Deductible Information to the Patient Chart
WebPT EMR | Add Copay, Coinsurance, and Deductible Information in Patient Chart
Enter copay, coinsurance, and deductible amounts in the Add Insurance/Policy Information screen, and payment types and amounts will carry through to patient appointments.

Go to the patient chart, and select Patient Info.
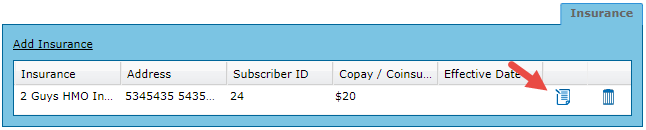
If you are adding insurance to a case for the first time, click the Add Insurance tab, select the insurance and click Next, then enter the amounts into the Policy Information screen.

If the insurance is entered in the case, Edit the insurance and click Next to get to the Policy Information screen.


Record Payments in Appointments
WebPT Scheduler | Record Payments in Appointments
You can access the appointment at any time to record payments or when they check in. Click on the appointment to open it, view the Appointment Action options, and collect the payment.

- If you have entered Copay, Coinsurance, and Deductible Information in the patient chart (see above), click Check In to open the payment screen and collect the payment.
- Otherwise, you must click the Payment button and manually add payment information.
Record Payments in a Patient Case
WebPT EMR | Record Payments in Case
Go to the patient chart, select the appropriate case, and click Patient Payments to record patient payments in the case. Use the Add Payment button to collect payment for any date of service.

Payment Collection Date and Time
When you hover over the patient payment, the payment collection date and time display in UTC.

Collecting Payments
WebPT EMR | Collecting Payments
Whether you are collecting the patient payment in the appointment or in the case you'll encounter the Collect Payment window.

When collecting payments the steps may vary based on the charge types, transaction type and payment types.
Click Add Charge to add a new charge or review the existing charge details.
Check the Paid check box next to each charge related to the payment or check Select All if the patient is paying their full balance.
Verify the Total Due.
Review or indicate the Provider payment association.
Choose the Payment Method from the dropdown. If the patient is paying by Credit/HSA/FSA Card follow the steps for Processing a Card Payment or a Partial Card Payment.
After collecting the payment, choose the appropriate Save Option from the dropdown menu to save the transaction. Then either close the screen, print a receipt, or print a full payment history for that patient’s case. You can also print a receipt for the visit later from the Print Receipt appointment action button.
Collect Payment Fields
WebPT EMR | Collect Payment Fields
| Collect Payment Field | Collect Payment Field Descriptions |
|---|---|
| Date of Service | Appointment date |
| Charge Type | Copay, Deductible, Coinsurance, Supplies, Wellness, Other, or Internal Payment. (P) indicates Primary Insurance and (S) indicates Secondary Insurance. ⚠️ Important: Payments marked as Internal Payment will not flow into WebPT Billing or Therabill. WebPT Billing Members: If using the Internal Payment option, ensure you exclude that dollar amount when balancing patient payments. |
| Amount Due | If entered in the patient chart (see above), the amount will populate; otherwise, you must add manually. |
| Description | Text field to customize payment description if desired. |
| Paid | Check to indicate payment received. |
| Trash Icon | Delete charge. |
| Add Charge | Record an additional payment. |
| Date of Transaction | Automatically defaults to the date you record the payment and cannot be changed. Payment Method is required; select Cash, Debit Card, Credit Card, HSA Card or Check. Entering card or check details is optional. |
| Total Due | All charges on the payment screen |
| Total Paid | Auto-calculation based on payments checked Paid. |
| Remaining Balance | Auto-calculation based on payments not checked Paid. |
| Provider | Indicate which provider to associate the payment to. |
Payment Receipts and Payment History
WebPT EMR | Payment Receipts and Payment History
- Print a visit-specific receipt from the patient's appointment. Open the specific appointment and choose Print Receipt
- You can print History at any time from the patient's case. Choose Print History
- Print a custom date range using the Payment Log.
Payment Log
WebPT EMR | Payment Log
The Payment Log allows you to review collections and outstanding balances for the entire clinic, and print date-specific records.
Discover more about the Payment Log.
Was this knowledge article helpful?